
This article provides a step-by-step process for issuers to follow when creating and defining credential definitions.
Accessing Credentials
First log in to the C.TI platform.
1. Login to https://cti.convergence.tech/login to access your organisation.
2. In the left-hand navigation bar, click the "Credential Catalog" tab.

3. Click "Define Credential" in the top right to define a new credential from scratch.
Defining Credentials
A blank form will display for you to enter helpful and critical information regarding the credential definition. Note that this is a template. When you issue the credential, you'll be able to enter variable information per Holder (recipient) at that time.
1. Complete the form, section by section. Most fields are optional, however the more information included with the credential, the more valuable it will be for recipients and those who recognize it.
- Choose Badge - This section allows you to select / change the badge tied to the credential. The badge is also displayed on cards in the credential catalog. To add a badge, click "Add Image." A pop-up will display for you to drag and drop a badge or select from your computer. You can also select saved badges here.
- Badges can be changed by clicking "Change" in the top right after a badge has previously been selected. You can delete a badge by clicking the "Delete" button.
- To save a badge to help make it easier to select for future credential definitions, click the "Save" checkbox that appears after a badge has been selected.

EXAMPLE: Screen view after badge selection

For a full walkthrough of a creating a new badge, refer to Customizing Badge Designs.
- Credential Name* - Add the name of the credential. The credential name can be the name of a course, conference, skill, certification, recognition, award, exam, membership, purchase, supply chain step, etc. This is an open text box to allow you to enter the perfect name based on your use case.
- This is a required field.
- The name of the credential will prominently display for the Holder and Verifier after issuance. Make sure it is clear what the credential is regarding.
EXAMPLES: Business Competition Certificate of Completion, Bachelor of Engineering Science, Leadership Certification, Critical Thinking Level 5, Clean Energy Certificate, Example University Digital Student Card, 2023 Robotics Club, Eagle Scout, Licensed Professional Engineer, Carpenter Apprenticeship Program, Proof of Purchase for Rocker Chair.

- Pin - You can pin important credentials to the top of your Credential Catalog using the pin icon to make it easier to find. Click the pin icon (
 ) to the right of the Credential Name field to pin. Once selected, the pin icon will be filled in (
 ). To unpin, click it again ().
 - Issuer Tag - Issuer tags allow you to easily identify a credential in the Credential Catalog. This is helpful for credential definitions with the same name, noting which are for testing, as well as calling out different teams or departments. Click in the "Issuer Tag" box and type in the text you would like to tag to this credential definition, then press enter to save it.
- You can add up to 3 tags.
- Tags are only visible to the Issuer. These do not display to the Holder or Verifier.
EXAMPLE:

- Description - Add a description of the credential. This may include the learning objectives of a course or module, details about an event, information about the item being purchased, insight on the stage in the supply chain, or anything else that describes what the credential entails. Provide as much detail as possible for maximum value and customize as needed.
- You can change the font size, bold text, italicize, underline, insert a link, and create bulleted or numbered sections.
- The description will display in the credential viewer for the Holder and Verifier to see.

- Content - Add rows for variable information related to the credential definition. This is where outcomes or values changes per recipient this credential is issued to. Consider examples such as Date of Completion, Level, Score, Credit Amount, Serial Number, Outcome, etc. To add a row, click "+ Add" or "Add Image."
-
- You must enter a Name for each row. Delete the row by click the "X" in the top right.
- To mark the row as required when issuing, toggle the "Required" field to the right of the row. Otherwise, when issuing, you can leave the field blank and it won't display in the credential viewer.
- You can set a default value in the Value field that can be changed later when issuing. This is helpful if most recipients will receive the same result.
- The Image option is mostly for membership cards. For the image, you will be able to upload a photo upon issuance.
- These fields will display in the credential viewer for the Holder and Verifier to see.
EXAMPLE: Screen view before selecting "+ Add"

EXAMPLE: Screen view after completing the rows

- Select Resources - Add resources that will always be issued along with the credential. This is where you can add supporting material, links, or resources to explain the credential and the insights behind it. Resources will be linked to issued credentials for easy access. To add a resource, select "Add Image," "Add PDF," or "Add URL."
- After clicking "Add Image," a pop-up will display for you to drag and drop an image or select from your computer. The image size must be less than 5MB.
- After selecting an image, click to upload and rename the field as needed.
- After clicking "Add PDF," a pop-up will display for you to drag and drop a PDF or select from your computer. The file size must be less than 5MB.
- After selecting a file, click to upload and rename the field as needed.
- After clicking "Add URL," enter the Name for the URL as well as the URL path.
- These fields will display in the credential viewer for the Holder and Verifier to see.
- After clicking "Add Image," a pop-up will display for you to drag and drop an image or select from your computer. The image size must be less than 5MB.
EXAMPLE: Screen view before selecting "Add Image," "Add PDF," or "Add URL."

EXAMPLE: Screen view after completing the section.

- Select Email Template - This section only displays for organizations with multiple email templates for issuance. Most organizations will default to the standard email template and this section will not display.
- To select the email template assigned to this credential, click the dropdown and select the email template name. When issuing this credential, the email template selected will be used.
If you want to upgrade your plan to include White Labeling features, or if you have White Labeling included and want to add email templates, reach out to support@convergence.tech.
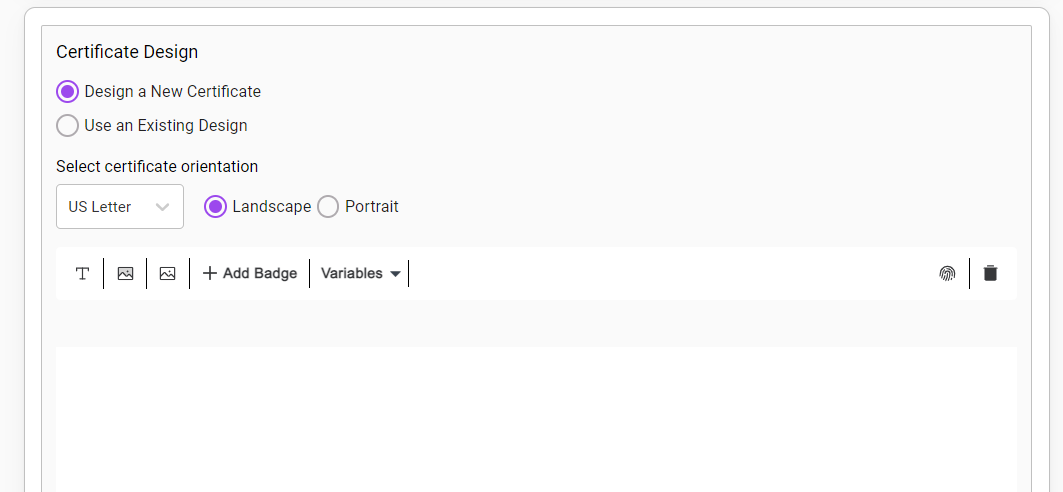
- Certificate Design* - This section allows you to select and format the certificate tied to the credential. You can opt to design a new certificate or use an existing design from another credential definition. After determining which option to move forward with, select the associated radio button.
- This is a required section.
- If you opt to "Design a New Certificate," you are able to customize the certificate.
- Start by selecting the certificate size using the dropdown.

- Pick the orientation of landscape or portrait using the radio buttons.

- Next, click the (
 ) option to add in a background image.
- Start by selecting the certificate size using the dropdown.
For a full walkthrough of a creating a new certificate from scratch, refer to Customizing the Certificate Design.
-
-
- Once the background image is added, use the remaining features to add text (
 ), images (
 ), badges (
 ), and variable content (
 ) on top of the design.
 - The Variables dropdown allows you to add and format a placeholder for the variable content that will be embedded when the credential is issued. Credential Name, Recipient Name, Recipient First Name, Recipient Last Name, and Issued Date will always be available in this dropdown. Other options will display based on the Titles you added in the Content section.
- After adding an element on the certificate design, you can update it by selecting and changing the font size, coloring, text alignment, font style, and opting to bold, italicize, or underline.

- Move around and resize by selecting the element and dragging it to where you want it, and resizing as needed. Toggles on the page will help you to center the elements.
- Delete any unwanted properties by selecting them and clicking the trash icon in the top right (
 ).
).
- Once the background image is added, use the remaining features to add text (
-
EXAMPLE: Screen view after designing the certificate

-
- If you opt to "Use an Existing Design," you will not be able to customize the certificate.
- Instead, a dropdown will appear for you to select the existing certificate design you would like to use. Search or select the design and a read-only version will display. You will not be able to edit.
- If you opt to "Use an Existing Design," you will not be able to customize the certificate.
2. After all the required data is filled in, click ‘Submit’ to create the credential. This will add it to your Credential Catalog tab. The credential badge, name, pin, and issuer tags from the credential definition will display on the credential card. You are now ready to issue the credential to the Holder.

For a full walkthrough of a single credential issuance, refer to Issuing One Credential. For a full walkthrough of issuing credentials in bulk, refer to Issuing Many Credentials.